Ionic Angular Clipboard Integration Tutorial

Clipboard-Integration


In this Ionic Clipboard example, we use the ionic native and Cordova Clipboard plugins to create a primary copy-and-paste function.

In theory, Clipboard is the perfect temporary memory that doesn't have a name. It is probably used to select the text, an image, a file, or other data types.

Primary, used when you copy data to the Clipboard. When you copy data to the Clipboard, the new data replaces the data that was previously stored.

We will show you how to add a clipboard plugin to an ionic and angular application to make a copy-and-paste feature.

The clipboard package is available through npm and ionic Cordova, and it works very well on iOS, Android, and Windows.

Ionic/Angular Clipboard (Copy & Paste) Example

  • Step 1: Getting Started
  • Step 2: Install Plugins for Ionic Native & Cordova
  • Step 3: Update Clipboard in AppModule Class
  • Step 4: Update Home HTML Page
  • Step 5: Update Home TypeScript Page
  • Step 6: Test the Ionic Application

Getting Started

We think you have already set up the Ionic command-line interface on your machine for development.

npm install -g @ionic/cli
Bash


You can use the suggested command to make a new blank Angular and Ionic project.


ionic start clipboard blank --type=angular
Bash


Go to the folder for applications:

cd clipboard
Bash

Remove Type Errors

There must be no strict type errors. Make sure "strictTemplates" is turned: false in the tsconfig.json file's angularCompilerOptions.


Install plugins for Ionic Native & Cordova

Next, you need to install Ionic native and Cordova plugins. By running the commands below, we will add Clipboard and native core plugins to the ionic app and install them.

ionic cordova plugin add cordova-clipboard

npm install @ionic-native/clipboard

npm i @ionic-native/core
Bash

Update Clipboard in AppModule Class

To use the Clipboard plugin's methods, you must add the clipboard module to the main app module class.

Add the code below to the app.module.ts file:

import { NgModule } from '@angular/core';
import { BrowserModule } from '@angular/platform-browser';
import { RouteReuseStrategy } from '@angular/router';
import { IonicModule, IonicRouteStrategy } from '@ionic/angular';
import { AppComponent } from './app.component';
import { AppRoutingModule } from './app-routing.module';


// module
import { Clipboard } from '@ionic-native/clipboard/ngx';


@NgModule({
  declarations: [AppComponent],
  entryComponents: [],
  imports: [
    BrowserModule, 
    IonicModule.forRoot(), 
    AppRoutingModule
  ],
  providers: [
    Clipboard,
    { 
      provide: RouteReuseStrategy, 
      useClass: IonicRouteStrategy 
    }
  ],
  bootstrap: [AppComponent],
})

export class AppModule {}
Bash

Update Home HTML Page

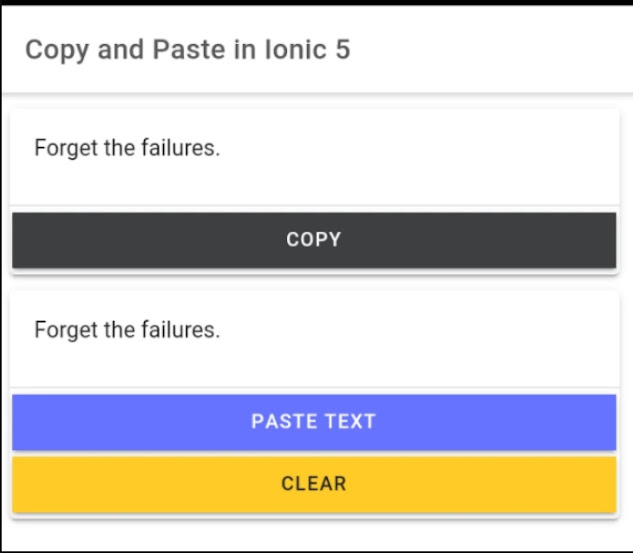
Let's set up Copy to Clipboard in Ionic. We'll need to define the text string with a copy button, copy it, and paste it into the input field for the paste area. Also, you can clear the text you copied, so add the clear button and its method.

Insert code in app.module.html file:


<ion-header [translucent]="true">
  <ion-toolbar>
    <ion-title>
      Copy and Paste in Ionic
    </ion-title>
  </ion-toolbar>
</ion-header>

<ion-content [fullscreen]="true">

  <ion-card>
    <ion-item>
      <ion-textarea [(ngModel)]="textCopy"></ion-textarea>
    </ion-item>

    <ion-button (click)="copyData()" color="dark" expand="full">Copy</ion-button>
  </ion-card>

  <ion-card>
    <ion-item>
      <ion-textarea [(ngModel)]="textPaste" expand="full"></ion-textarea>
    </ion-item>

    <ion-button (click)="pasteData()" color="tertiary" expand="full">Paste text</ion-button>

    <ion-button (click)="clearClipboard()" color="warning" expand="full">Clear</ion-button>
  </ion-card>

</ion-content>
Markup

Change the home page for TypeScript

The Clipboard API must be imported and added to the primary constructor. After that, you can use the copy() or paste() methods to create a copy from the clipboard feature.

Add code in the home.page.ts file:

import { Component } from '@angular/core';

import { Clipboard } from '@ionic-native/clipboard/ngx';

@Component({
  selector: 'app-home',
  templateUrl: 'home.page.html',
  styleUrls: ['home.page.scss'],
})

export class HomePage {
  
  textCopy:string = "Forget the failures.";
  textPaste:string = "Paste text here";

  constructor(private cb: Clipboard) { }

  copyData(){
    this.cb.copy(this.textCopy);
  }

  pasteData(){
    this.cb.paste().then((resolve: string) => {
         this.textPaste = resolve;
         console.log(resolve);
       }, (reject: string) => {
         console.error(reject);
       }
     );
  }

  clearClipboard(){
    this.cb.clear();
  }

}
TypeScript

Test the Ionic Application

Let's start testing the clipboard feature. It's easy to get an ionic app up and running.

To add the platform for iOS, Android, or Windows, you need to do the following:

ionic cordova platform add ios

ionic cordova platform add android

ionic cordova platform add windows
Bash

Start building the app:

ionic cordova build ios

ionic cordova build android

ionic cordova build windows
Bash

The last step ( In the application ) is to run the program:


ionic cordova run ios -l

ionic cordova run android -l

ionic cordova run windows -l
Bash

Angular-Clipboard


Conclusion

We finally added a minor feature to the Ionic Angular application by adding the Clipboard plugin. You can also use a button in the input field to copy and paste the text.

The clear button will clear the clipboard.

You can tell us in the comments if you have any difficulties or questions.

Post a Comment

0Comments
Post a Comment (0)

#buttons=(Accept !) #days=(20)

Our website uses cookies to enhance your experience. Learn More
Accept !