INTRODUCTION
In this tutorial, I am going to explain, how to get the current location using the geolocation plugin of Ionic/Angular. It's a straight forward tutorial. You can get the location in a few steps. I hope you already know what Ionic is and how it works.
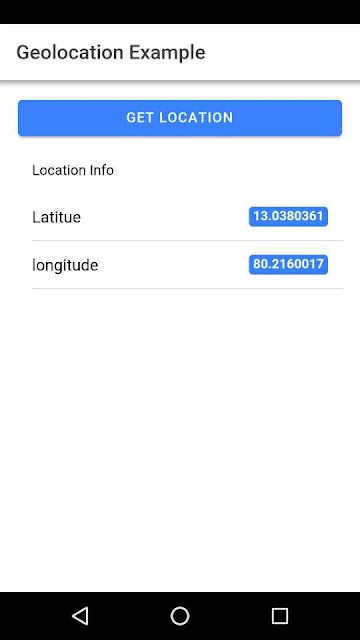
Before we deep into our code, let me show you what actually we are going to buid:
So let’s dive right in!
You should have the latest version of nodejs and ionic installed in your machine, with that let’s go and create an Ionic/angular app now & integrate authentication in it.
To get started we need to create an Ionic/Angular application first. For that Open your Terminal or CMD and then go to the directory/location in which you want to create your new Ionic/Angular application. Below command will help you to navigate through directories in CMD.
So, to create a new Ionic/Angular application. you can run ionic start & then the application name which you want to set for your application. Below command will create it for you.
Once 'NPM' dependencies & modules installed, you will see a question which will prompt for Yes Or No, just type `N`.
Next, go to the application folder which you created just now.
Great! We have successfully set up our Ionic/Angular Geolocation application. Now it's time to integrate GeoLocation plugin.
Step 2 — Integrate GeoLocation in Ionic/Angular
To access GeoLocation in our Ionic Application, we need to install GeoLocation plugin first in our application. To install GeoLocation plugin run these command in your ionic project by terminal:
ionic cordova plugin add cordova-plugin-geolocation
npm install @ionic-native/geolocation
Step3:
Now that we have installed GeoLocation plugin in our application. Now, we can't use GeoLocation plugin in our application directly, we first need to import it in app.module.ts file.
In the app.module.ts file, import the geolocation class.
import { Geolocation } from '@ionic-native/geolocation/ngx';And you will have to include the Geolocation class into your app module provider.
providers: [Statusbar,
Geolocation
SplashScreen,
{provide: ErrorHandler, useClass: IonicErrorHandler}
]
The step above must be done. If you don't do this, you'll get an error like "no provider for geolocation."
Step4:
Now lets move on to our actual code. Import the geolocation to the home.page.ts file like this.
import { Geolocation } from '@ionic-native/geolocation/ngx';Make a reference to an object in the Geolocation class.
constructor(private geolocation: Geolocation)
{
}
Now with that. Let's create a function where we will implement a code to get user current location and also with this we will pass some extra parameters. Create a function and call the getLoc() function of geolocation class.
getLoc() { this.geolocation.getCurrentPosition(
{maximumAge: 1000, timeout: 5000,
 enableHighAccuracy: true }
).then((resp) => {
      // resp.coords.latitude
      // resp.coords.longitude
      // alert('r succ' + resp.coords.latitude)
      alert(JSON.stringify(resp.coords));

      this.lat=resp.coords.latitude
      this.lng=resp.coords.longitude
      }, er=>{
        // alert('error getting location')
        alert('Can not retrieve Location')
      }).catch((error) => {
      // alert('Error getting location' + JSON.stringify(error));
      alert('Error getting location - ' + JSON.stringify(error))
      }); }
The lat and lng variable will be used to display the location on the html file.
Step5:
Now let's call this function and display lat and lng in our app. So, Create a button in the home.page.html file and add a click event to the button and call the above function which we created in our .ts file and this function will get user current location lat and lng which we store in variable and display in our .html file.
  <ion-button (click)="getLoc()" expand="block">Get Location</ion-button>

  <ion-list>
    <ion-list-header>
      <ion-label>Location Info</ion-label>
    </ion-list-header>
    <ion-item>
      <ion-label>
        Latitue
      </ion-label>
      <ion-badge slot="end">{{lat}}</ion-badge>
    </ion-item>
    <ion-item>
      <ion-label>
        longitude
      </ion-label>
      <ion-badge slot="end">{{lng}}</ion-badge>
    </ion-item>
    </ion-list>
Here I displaying the output in a list format using the lat and lng variable.
That's all. Now you can deploy this app to your mobile and check it.
Deploy App:
It's time to build our Ionic/Angular application to test it in mobile devices.
ionic cordova platform add android
ionic cordova run android --aot
If your phone is connected to your computer via USB, the command above will make an APK and install it to your phone.
Conclusion
The Ionic 5 Cordova Geolocation and Geocoder plugins tutorial are finally over. We've learned in this guide how to:
- Ionic/Angular basic application creation
- Install and Set Up the Geocoder & Cordova Geolocation Plugins in your Ionic/Angular app.
- Locate Current Location Latitude & Longitude.
- Track Current User Address.
- Add Target Platforms.
- Build Ionic/Angular App.


