INTRODUCTION
In this tutorial, we will build simple image uploader in Ionic 4 Framework and we will also preview the uploaded image in our app. I hope that you already know the basics of Ionic. We will use CLI, HTML CSS, TS etc.
What Is Ionic?
Ionic is a popular framework for making hybrid mobile apps that use the general Angular framework.
Do you want to make apps that can be used on iOS and Android? With Ionic, you don't have to make different apps for Android and iOS anymore. Instead, you can use Ionic to make a single code base that works on Android and iOS.
One great thing about Ionic is that you don't have to start from scratch to learn a new language. Developers can make full-featured mobile apps for Android and iOS using technologies like JavaScript, HTML, and CSS that they already know.
PREREQUISITES
First of all we will start with installing Node and Ionic if you don’t have already installed. Follow Setting up Ionic 4 Tutorial or visit Ionic Framework docs for more info.
For a little quick view, you can use below command to create blank new Ionic Project:
ionic start <projectName> blank --type=angular --spec false
Now we’ve got everything we need set up, so let’s get started.
Ionic 4 Steps
Step 2 — Using ImgBB website for uploading images.
Step 3 — Using HttpClientModule for sending http requests.
Step 4 — Upload Images via API and Preview them.
Step 5 — Run the app on browser, android or ios to test app.
Before we proceed further, let me show you, what exactly we are going to build:
Hope you guys like it. Let's move on to the actual functionality of the code.
** — Let's Start
Now go to src/app/app.module.ts and import HttpClientModule like the following code:
Once this is done, before we proceed further we need imgBB website API key, for that we have to create account there first. So go head and create your account there and then let's see how we can get API from there.
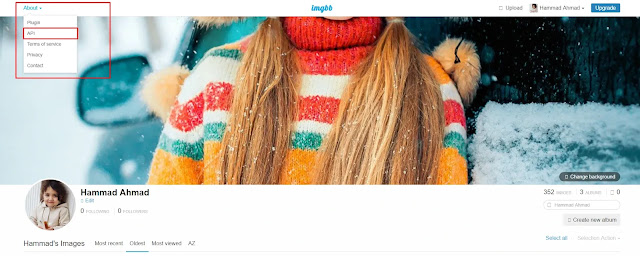
So, once you are done with creating account in imgBB. In your dashboard, click on top right about menu, and then click on API button. Like below:
after that, click on AddKey button on the top of the page and get your apiKey from there. Like below:
That's it. Now let's move on to our Ionic code and see how we can upload images from our app and preview them.
Go to home.page.html and implement this code:
<ion-content [fullscreen]="true">
  <ion-list lines="full">
    <img
[src]="imageURL ? imageURL : 'assets/dummy-profile-pic.png'"
class="rounded mx-auto d-block img-thumbnail" alt="HA"
       (click)="uploadFile()">
    <input id="fileBtn"
type="file"
style="display: none"
(change)="fileChanged($event)"
accept="image/*"
class="filebtn"
        #fileButton  />
    <br /><br />
  </ion-list>
</ion-content>
Now go to home.page.ts and implement this code:
import {Component, ViewChild} from '@angular/core';
import {Router} from '@angular/router';
import {HttpClient} from '@angular/common/http';
import {AlertController, LoadingController} from '@ionic/angular';
bookingForm: FormGroup;imageURL: any = null;
@ViewChild('fileButton', {static: false}) fileButton;
imgBBKey = '<YourApiKeyHere>'; // example: imgBBKey = 'abc...'constructor(
private router: Router,
private httpClient: HttpClient,
private alertCtrl: AlertController,
private loadCtrL: LoadingController,
) {}async presentAlert(title: string, content: string) {
const alert = await this.alertCtrl.create({
header: title,
message: content,
buttons: ['OK']
});
await alert.present();
}uploadFile() {
const btn = document.getElementById('fileBtn');
btn.click();
}fileChanged(event) {
const files = event.target.files;
console.log(files);
const imgData = event.target.files[0];
const reader = new FileReader();
reader.onload = () => {
// this.imageURL = reader.result;
const form = new FormData();
form.append('image', imgData);
this.loadCtrL.create({
message: 'Please Wait...',
spinner: 'lines'
}).then(elementEl => {
elementEl.present();
this.httpClient.post('https://api.imgbb.com/1/upload?key=' + this.imgBBKey, form).subscribe(res => {
elementEl.dismiss();
console.log(res);
if (res['status'] === 200) {
this.imageURL = res['data'].display_url;
}
}, (err) => {
elementEl.dismiss();
if (err) {
this.presentAlert('err: ' + err['error'].error.code, err['error'].error.message);
}
});
});
};
reader.readAsDataURL(event.target.files[0]);
}
That's what we have to do. Don't forget to replace the apiKey with your imgBBApiKey . Now what this all code will do???. When we will tap on the image in our app, it will ask us to select any image that we would like to preview, when will select any image, it will upload that image to our imgBB account and imgBB will return us imgURL which we can store to display our image in our app. And that's what we are doing in our code here. We also created a presentAlert(title: string, content: string) {} function which will present an alert with error message if for somehow image not uploaded, etc.
Perfect, We are done with it. So we can run the app now. We can run this app on device or emulator. The easiest way to run our app on phone using Ionic Serve. Run the following command in terminal and w8 for this to launch in browser.
Your app will appear automatically in Chrome or whatever browser you've installed, after terminal finished compiling app.
We successfully uploaded an image and preview in our Ionic App. So, we can check it browser, also in android or iPhone and even on real device. Do you wanna build it???, To build our app, run this command:
This will build your app and after building, you can test your Ionic App in a real device.
Conclusion
If you have any question, let me know in the comments below and I will try to best to help you!


I foolow your tutorial, but I am getting cors issue at my localhost. May I know what could be the reason?
ReplyDelete